Deploying Paroli's website
-
Clone the website's repository using Git:
git clone https://gitlab.com/action-lab-aus/phoneconferencing/bd_conference_web.git -
Update the .env file with your preferences for this deployment:
VUE_APP_SITENAME=Test (The name for your site, will be used like "Paroli | Name") VUE_APP_DEFAULT_LANG=en (The default language your site should load in) VUE_APP_DEFAULT_PHONE=+61 (The default country code your that should be selected when a user adds a new phone number) -
In /src/firebase.js, update the initializeApp function to use your Firebase config (as previously downloaded in firebase_config.json)
-
Run the project locally:
npm run serve -
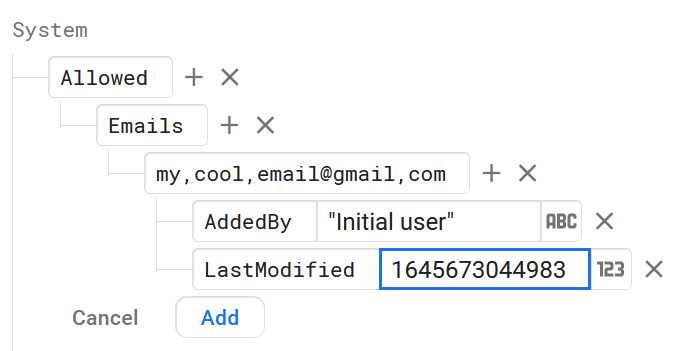
As calls can quickly cost significant amounts of money, Paroli limits who can create an account and use the service. The service only allows emails on an 'allowed list' to make accounts. Two lists exist: one of individual email addresses (e.g. my.name@email.com) and domains (e.g. gmail.com, paroli.live). If listed on the Domains list, any email address ending with that domain will be allowed to create an account - so don't add free email providers, like gmail or outlook. Later on, domains and addresses can be added to the allowed list through a hidden admin page. However, as we can't yet log into the website, the first account needs to be added manually through the database. Go to the Firebase console, Realtime Database, and add the following node (Note: When adding your own email address, be sure to swap out the periods in your email address with commas, as shown. Firebase doesn't allow keys to contain periods, but luckily email addresses can't contain commas, so we can swap them out!):
-
Once you've been able to make an account, confirm your email address and sign into the site. Now you want to grant your account with an admin token, which will allow you to access locked-off parts of the GUI. While future administrators can be added through the website itself, the first admin must be manually added. The easiest way to do that is to uncomment the
elevateCurrentUsercode found in /src/router/index.js, and add the admin password that you set as an environment variable when deploying the Firebase Functions. Navigate to http://localhost:8080/admin/allowed to elevate your current user to an admin. Once you're done, make sure to comment the code again and remove the password string before deploying or committing changes. As the project owner, you may also want to make yourself a 'super admin', which will make it so that other admins cannot remove your priviledges through the GUI. To do this, go to your account on the Users node in the Firebase console's realtime database and add the propertyIsSuperAdmin : true. - Build and then deploy the website like so:
npm run build
firebase deploy --only hosting